
Introduction To 1.8kW BLDC Motor Wiring
BLDC Motor Technology Overview
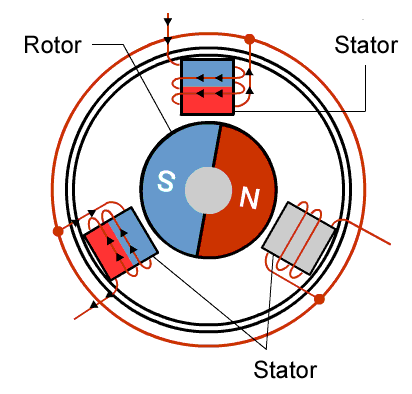
Brushless DC(BLDC) motors have been invented as a somewhat modern innovation in the field of electric motors, known for its substantial efficiency and reliability enhancement. Their service life becomes much longer than that of their predecessor, the brushed motor. This is achieved due to the electronic commutation system instead of mechanical brushes, which implies virtually to no mechanical wear and ensures precise control of the speed and torque of the motor. BLDC motors are often used in the machines that require precise speed control such as electric vehicles, HVAC systems, and drones.

1.8kW BLDC Motor Specifications and Features
The 1.8kW BLDC motor is powerful with an 1.8kW nominal power output. It is able to develop high torque on a broad range of speeds. It is designed to work around 48 volts DC with the peak efficiency greater than 85%. It has a rugged design that allows for a continuous operation under changing load. It is also has thermal protection, which allows to work at a lower level of power to avoid overheat. All this features make it a perfect motor for industrial purposes and powerful consumer products.
Step-By-Step Guide To Wiring A 1.8kW BLDC Motor
1. Gather necessary tools and materials:
If you wish to establish a connection of 1.8kW BLDC motor, you will need to have specific tools. These include wire and soldering equipment, such as wire strippers and screwdrivers, as well as electrical tape, multimeters, and soldering irons.
All the tools and materials are to have the correct rating, which means that you need to guarantee that all of them are adapted to the proper voltage and current conducted by your BLDC motor. In addition, 1.8kW motor commonly utilized 14-16 gauge wire.

2. Prepare the Motor and Wiring Area:
Before you start wiring, you must make sure that the motor and the control unit have been correctly configured and are ready for installation. The first step towards this is to mount the motor on a clean, dry and stable surface so that it cannot move when the assembly is functioning. Remember that it is also important that you have some good lighting so as to avoid any mistakes regarding the connections. Following this, you must have a very careful look at the control unit so to check whether there are any signs of damage or wear. If you see that the heat sink or another other contact surface is dirty, you must clean it with a cloth and then apply thermal paste to the high-temperature areas so to improve thermal conductivity and extend the life of the components.

3. Connect the Motor Wires:
To connect a brushless DC motor to an ESC,firstly, identify the motor phase wires, which are usually internally labeled as U, V, and W. Connect these phase lines to the corresponding outputs of the ESC in the same order.
If you want to make a permanent connection, solder the phase wires to the ESC using a soldering iron. But if you prefer a removable setup, connect these wires with a crimp connector.
For the motors having Hall sensors to provide the rotor position feedback, you should plug these sensors into the designed service ports in the ESC. Make sure that these connections are not only tight but also correspond correctly. Otherwise, the phases might be misaligned and cause the motor to work inefficiently or even become damaged.
4. Test the Connection:
Before running the system, you should firstly use an multimeter to ensure that it has continuity. Connect the power and start a simple low-power test run. Pay attention to whether the motor is abnormal, such as: make a harsh or abnormal sound, or stop run. Then adjust the wiring and load to avoid the abnormal phenomena and make the motor run smoothly. Then you can use a multimeter to measure the impedance between the motor’s three phase lines to know whether it is proper connected.
5. Precautions for Wiring Power Supply:
When you connect the power supply, you must determine whether the power supply can drive the motor. You must also use the power and motor wires appropriate to deliver the maximum current you want to provide. You must also consider the EMI related to the power lead, this interference may affect other electronics in your system. In this cases, you can choose a higher quality wire and install an EMI filter to get a better interference abatement effect in the process of motor operation by the same power supply and the same wiring.
After the motor is running, you can use the oscilloscope to get the total voltage waveform to see whether the connection is correct by observing the phase voltage. If the connection is correct, the total voltage waveform is asymmetric.If the connection is not correct, there will be high impedance state in the waveform of the straight line of the total voltage waveform.

Troubleshooting Common Wiring Issues
Diagnosing Electrical Connection Problems
Electrical connection problems with BLDC motors reveal themselves in unexpected motor behavior such as rough start or failed start. To diagnose such problem, which seems to be common, you can check all the wires on the subject of tightness and alignment. Using a multimeter, test wires and connectors one by one on continuity. If the continuity is interrupted, there is possibly a faulty wire or a connector, both of which should be replaced. Also, make sure to verify that the motor phases are all correctly connected, as a mismatch could cause severe performance problems. This should solve any most common problems with motor behavior.
Dealing with Wiring Overheating
The heating of the connected wires can pose a serious safety hazard as well as reduce the performance and life span of the motor. This typically occurs due to insufficient wire gauge or a poor connection. In order to fix this issue, the user should first verify if the used wire gauge is suitable to the current load. If it is not, you will have to switch to a thicker wire. Also, make sure that the connections are made tight and there is no sign of corrosion, as poor connection can add to the overall resistance and therefore to the heating. Also, consider installing a radiator or a cooling fan to compensate for the heating.
Solutions to Vibration and Noise Problems
The vibration and noise are common for a poorly installed or malaligned motor. To reduce it, make sure that the motor mount is stiff and all its screws are tight. Also attach a vibration damping material between the motor and the mounting surface. If the sound or vibration persists, check whether the motor and the controller is maligned and realign them. Balancing the rotor of the motor and using elastomeric couplings help to reduce the vibration and noise of controller greatly, which leads to increased operational smoothness and reduced component wear.
Comparative Analysis of Different Models

VS

Key Operational Differences Between Models
The operational differences between the 1.8KW Encoder DC Brushless Motor and the same motor with the electromagnetic brake show that adding the brake can help with performance and safety. The motor alone works efficiently under normal conditions, with a very high level of control due to the encoder. However, the version with the brake will be safer, as it can be stopped immediately in case of a malfunction or even power failure.
The efficiency of the brake-equipped model is typically slightly lower due to the need to spend more power on the brake. However, this tradeoff is usually acceptable as the added control can be critical for stopping robots or emergency systems in automotive applications.
Adaptations in Wiring for Different Use Cases
As have been mentioned earlier, wiring adaptations differ one for another depending on their application. To be more specific, in a relatively basic consumer application, such as a home appliance, the use of the standard model without a brake is likely to be preferable. The reason for that is relatively clear: the use of the standard model is more straightforward and benefit from the point of view of cost-effectiveness. The situation is reversed in the case of any type of industrial application. The model electrical wiring as per the brake-inclusive model cannot under any circumstances be overlooked. The use of this model depends on the simple fact that in many industrial applications, safety measures cannot be compromised, and the brake is, therefore, indispensable. However, this comes with a significant increase in the complexity of wiring. Due to this complexity, the wiring must be carefully planned and executed.
If in this case,the wiring must effectively integrate the additional safety circuits, which in turn implies the necessity of a relay or a brake controller that can handle the extra current and make sure that the brake engages, and disengages at the right moments.
Tips for Customizing Connections Based on Model
In order to properly customize the connections for either model, it is essential to understand the needs of the application and the exact operations of each type of motor. For the standard motor, the primary system that needs to be connected is the encoder. Once connected, it needs to be properly calibrated. In some cases, the encoder feedback loop that was connected needs to be adjusted because the motor is not performing correctly. In other cases, the controller needs to be re-calibrated based on performance data.
For the brake-equipped motor, the proper connection to safety-related elements is paramount. All such circuits need to be connected and tested on their own and in interaction with one another. In critical applications, it is possible to add an additional level of redundancy by deploying dual-circuit brakes. In addition, it is important to properly shield all components to prevent overly hot environments from causing failures and electromagnetic interference from damaging sensitive components.
In conclusion, the selection of the best motor model and the selection of connections must be based on the application’s safety needs and operational requirements. Both models offer good solutions, but the connection needs to match the motor’s performance characteristics to its application to ensure safety and correct operations.


