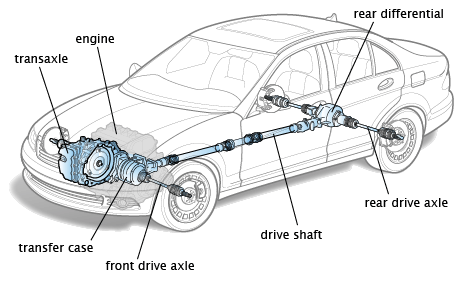
Lift the vehicle and secure it with jack stands. Installing the drive shaft and drive axle requires accurate alignment. Be sure to check and test the new parts’ operation at the end.These two components differ in function and installation. The drive shaft is responsible for transmitting the engine’s power to the drive bridge, while the drive axle transmits power from the drive bridge to the wheels. The Drive Bridge contains the drive axle and differential and is the overall structure connecting the wheels to the power system.
Preparation Tools
To begin with, a torque wrench helps ensure that bolts are tightened to a specified torque. When utilizing a torque wrench, one should ensure that it is accurate; with an inaccurate one, the bolts will either be over-tightened or under-tightened, causing problems with the new components.
Secondly, a jack is used when one needs to lift the car and install new parts, and then secure the whole system on jack stands. The jack’s minimum load capacity should be around 2 tons, and the jack stands should also be rated for 2 tons. They should be locked in place securely under the vehicle, as not doing so can cause the car to fall and result in injuries.
Finally, when taking the old parts apart, one might need a socket wrench set. Among the items it should contain are 8mm, 10mm, and 12mm sockets because these are the most common sizes when it comes to bolts. A pry bar is also useful when attempting to take apart a component that is stuck to the vehicle.
Remove Old Parts
The drive shaft is typically connected between the transmission and the rear differential. According to a report by the Automotive Service Association (ASA), the connection points of the driveshaft usually use M8 or M10 bolts. For example, ASA’s investigation shows that the standard torque for M10 bolts is generally 40-50 Nm. Make sure to use the correct tools and sequence during disassembly to avoid damaging the components.

Drive Shaft Disassembly Steps
- Remove all bolts securing the drive shaft. According to the Global Automotive Repair Standards (GARS), the standard torque for drive shaft bolts is 45 Nm. This standard applies to most front-wheel and rear-wheel drive vehicles. The torque wrench should be accurately adjusted to this torque value to ensure the correct tightening of the bolts.
- Use a support stand to hold the drive shaft in place to prevent it from suddenly falling. According to the recommendation of the Society of Automotive Engineers (SAE), the load capacity of the support stand should be at least 2 tons. SAE research indicates that the support stand should be firmly positioned under the vehicle to avoid accidents during the operation.
- Carefully slide out the drive shaft. If the drive shaft is equipped with U-joints or CV joints, as mentioned in the SAE guidelines, these joints require special care to avoid damage. When using a slide hammer or pry bar during disassembly, avoid excessive force to prevent damage to the joints.
For Drive Axle Disassembly

- First, it is necessary to remove the drive axle nuts, which typically require 80-100 Nm. According to the report offered by the International Automotive Repair Technology Committee (IARTC), such a torque range should be applicable to the majority of vehicle models.
- The next step is to pull the drive axle out of the differential. This work should be done with a proper tool and cautiously not to damage the surrounding system parts. The IARTC research has indicated that such a process should progress slowly to make it possible to avoid any damage to the wheel axle and differential.
Installing New Parts
To install a new drive shaft and drive axle, it is first essential to make sure that all new parts are up to the specs. The drive shaft must be aligned to the transmission and differential. Insert the drive shaft making sure that it is aligned to the transmission joints and slides into it. The manufacturer usually advises tightening the securing bolts to 40-50 Nm.
The same is with the drive axle. It must be aligned to the differential and wheel axle, then pushed inside the differential. It is vital to make sure that all connection points are aligned. Use a socket wrench to ensure that the torque is 80-100 Nm. Make sure that all bolts and nuts are tightened to the right torque to prevent any from coming loose while driving.
Adjustment and Testing
Drive shaft and drive axle require adjustment and testing after the installation to ensure proper operation. In the case when the drive shaft and drive axle are not aligned properly, it may cause vibration or unusual noise. If there are some unusual vibrational sounds during driving, it is recommended to return to the place of installation of the drive shaft and drive axle and correct the installation.
Make sure that all bolts are held properly. After testing, screw and tighten all bolts and nuts with the torque to the manufacturer’s specifications. You can also use a wheel balancing machine to detect bending of the drive shafts. In the case when there are some problems setting up the drive shaft and drive axle, it may be helpful to read the repair manual of the car or ask a specialist.